Table of Contents
SLICE-QTC Four-Channel Temperature Controller Quick Start Guide
Model No. SLICE-QT AND SLICE-QTC
Document Revision: 1
Document Last Updated on 2021/08/26 14:26
Please read Limited Warranty and General Warnings and Cautions prior to operating the SLICE-QTC.
Links
Click here for the SLICE-QTC Owner's Manual
Click here for the SLICE-QTC API.
Click here for the Ziegler-Nichols loop tuning instructions.
Click here for the SLICE-QTC web page.
Click here for the Github page for SLICE-QTC GUI
Click here for the Github page for SLICE-QTC firmware revisions
Contact sales [at] vescent [dot] com for questions and corrections, or to request added functionality.
Description
The SLICE-QTC is a high-precision temperature controller (see figure 1). It will control up to four thermal plants with sub-millikelvin precision.
Purchase Includes
- SLICE-QTC Temperature Control Unit
- AC power cord with appropriate wall plug for you location (if known)
- Four single-ended 6-ft control cables1)
List of Symbols
 | Warning. Pay special attention to procedures and notes. |
 | Potential for electrical hazard. |
Getting Started
When presented with a given view, it is possible to select the functionality or change the values in any field bordered in blue. When a particular field is actively being edited, its border will be yellow.
- Using table 1, make connections from the SLICE-QTC to your thermal plant via the cables supplied by Vescent. Peel the shield back to make connections. The shield is connected to the SLICE-QTC case. It is not recommended to connect the shield to the plant as ground loops may be formed, degrading performance.
- Use the supplied AC power cord to provide power to the SLICE-QTC. The power converter inside the unit will accept any line voltage within the range in table 2.
- Turn on the SLICE-QTC with the power switch on the back of the unit located on the power entry module.
- From the Home screen, touch the CH icon for the channel to be used to go to the Channel Detail screen.
- Touch Settings > Load Limits
- Set the Current and Power limits for you transducer.
- Touch the Return icon.
- Touch Settings > Plant
- Enter in the parameters for your thermistor.
Note: Enter EITHER Beta, Reference Temperature, and Reference Resistance OR the Steinhart-Hart Constants, A, B, and C. The other set of parameters will be automatically calculated. - Select the Transducer Type: either TEC/Bipolar or Heater/Monopolar as appropriate to your plant.
- When choosing TEC/Bipolar, also select Negative of Positive Polarity as appropriate.
- Return to the CH Detail screen by touching the accept icon.
- Touch Settings > Limits
- Set the absolute minimum and absolute maximum temperature allowed for your plant.
- Set the lock range. This range determines over what value of ∆T = Tact - Tset the system is considered to be locked. If ∆T is outside of this range, the Error field will change from green to yellow. This range will appear as yellow dashed lines on the plot of ∆T vs. time on the Channel Detail screen.
- Return to the CH Detail screen by touching the accept icon.
- Touch the Setpoint Temperature button to enter the desired set point temperature.
- Touch Settings > PID
- Set the PID parameters for your plant
- Touch each window to set the given parameter. We recommend the Ziegler-Nichols method of loop tuning.2) Instructions on using this method can be found here.
- Touch the OFF icon to engage the temperature servo
- Monitor on the performance screen to ensure system settles
 | Use caution grounding the shield (drain) at the transducer end of the interface cable as ground loops may be formed, degrading performance. Consider floating the plant or not connecting the shield to the plant chassis. |
 | WHEN USING A RESISTIVE HEATER, be sure to set the transducer type (CH X > Settings > Plant) to Heater/Monopolar. If set to TEC/Bipolar, attempts by the SLICE-QTC to actively cool your plant could result in a thermal runaway condition. |
You may purchase more cables separately from Vescent Photonics. We do not recommend making cables, but if you do so, make sure the metal sleeve (drain) is well connected to the chassis of the SLICE-QTC. Ground loops may form degrading performance if you connect the plant side of the drain to the plant chassis. Consider floating the plant or not connecting the drain to the plant chassis.
The SLICE-QTC will accept input line voltages within the ranges in table 2.
Front Panel
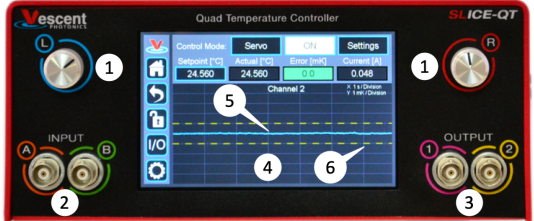
The front panel can be seen in figure 2. The functions and connections are as follows:
- Parameter input adjustment knobs
- Control signal inputs
- Signal monitor outputs
- Touch screen with view of CH 2 Details screen
- ∆T plotted as a function of time (blue line)
- System locked range (yellow dashed lines)
Rear Panel
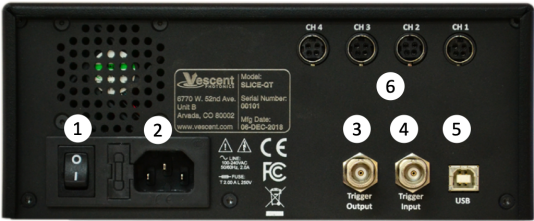
The rear panel can be seen in figure 3. The functions and connections are as follows:
- Main On/Off power switch
- AC line power in3)
- Output trigger (BNC)
- Input trigger (BNC)
- USB port (Type B)
 Fig. 3: View of rear of SLICE-QTC
Contact sales [at] vescent [dot] com for questions and corrections, or to request added functionality.


